Lineare Gleichungssysteme grafisch lösen/Station 3: Unterschied zwischen den Versionen
Aus DMUW-Wiki
| Zeile 1: | Zeile 1: | ||
| + | <div style="margin:0; margin-right:4px; margin-left:0px; border:2px solid #f4f0e4; padding: 0em 0em 0em 1em; background-color:#f4f0e4;"> | ||
| + | '''Inhaltsverzeichnis:''' [[Benutzer:Sarah Hatos/Lineare Gleichungssysteme grafisch lösen|Station 1]] - [[Lineare Gleichungssysteme grafisch lösen/Station 2|Station 2]] - [[Lineare Gleichungssysteme grafisch lösen/Station 3|Station 3]] - [[Lineare Gleichungssysteme grafisch lösen/Station 4|Station 4]] - [[Lineare Gleichungssysteme grafisch lösen/Station 5|Station 5]] - [[Lineare Gleichungssysteme grafisch lösen/Station 6|Station 6]] | ||
| + | </div> | ||
| + | |||
=Station 3= | =Station 3= | ||
Version vom 21. Januar 2010, 22:29 Uhr
Station 3
Du hast bereits kennengelernt, wie man ein Lineares Gleichungssystem grafisch löst.
Ordne nun dem jeweiligen Gleichungssystem die richtige Zeichnung und Lösung (Schnittpunkt) zu!

 und 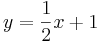 |
 |
L = {( 2 / 2 )} |
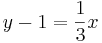
 und  |
 |
L = {( 4 / 2 )} |
 und  |
 |
L = {( 3 / 2 )} |